So, a few months back, I came across a few more of my old Dinky and Corgi toys. These included a 1966 Man from Uncle Thrushbuster. As is the case with all these beloved old toys, this had been played with and was extensively toybox chipped.
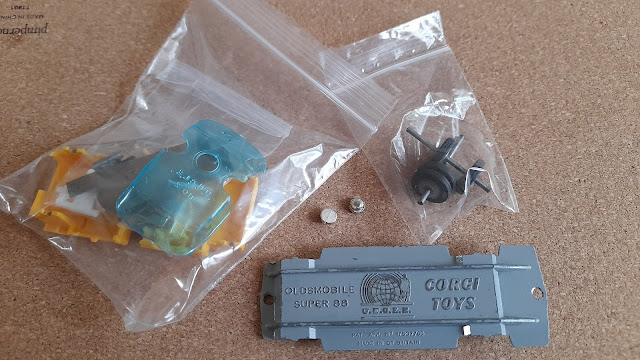
The wing mirrors on the original were broken long ago, and the periscope was missing. The original tyres were perished. Replacement parts were ordered from eBay.
After drilling the rivets out, I found that the remaining plastic components were in good condition and not broken or cracked. They just required cleaning with warm soapy water. The Perspex component was polished and the whole lot bagged up and put to one side.
The next bit proved intensively frustrating. Having received a limited response to my requests for the correct colour blue. I found that the small can I'd bought was chemically incompatible with the clear lacquer required as the final coat. This meant that the days of spraying primer, drying, topcoat, drying and applying the waterside decal, were ruined when I put the clear lacquer on, as it all turned into crazy paving!
This time, I visited Halfords, with an old friend (who actually remembered playing with my exact same car when we were kids) Wayne, is a professional photographer and fine artist. We found a pretty much a perfect match at Halfords, and all the paint was fully compatible.
So, it had to be soaked in paint stripper and the whole painting process undertaken all over again!
First, the grey primer, followed by some silver, airbrushed onto the front grille and rear.
Then the silver areas were plugged with blu-tack and the beautiful metallic/pearlised dark blue colour coat applied.
Lastly the application of the Man from Uncle decal. The original was a paper sticker. But, there were some aspects of the toy that annoyed me as a child, like the paper sticker, and the excess of sliver paint on the front and back.
The decal was created by scanning the original sticker at high resolution and then worked on using photo and graphics software. Then shrunk down to actual size and printed on white waterside decal paper using a laser printer. The blu-tack was pulled out from the front and rear grilles, and the waterside decal applied. As all the paint components were chemically compatible, the clear lacquer went on without any issues and it was just left to dry.
The last bit was really fiddly, but the internal pieces were fitted back into place, and the hardest part which was riveting the baseplate into position, without screwing up the finish. The next time I'll do one of these I'll use small capscrews.
The end result before a final polish.
And now ready for the Jubilee!
Bill Everatt
UK.


Very nice, and a perfect result.
ReplyDeleteExcellent. May I suggest polishing the hubcaps (or spraying them with the tyres removed) and perhaps even blacking up the tyres a bit?
ReplyDeleteHi Kid. I did consider that, but decided to leave them as they were. I cleaned them with a rotary fine wire brush back to how I remember them.
DeleteBesides now it's been riveted back, so talking it apart now will involve drilling the rivets out. Thank you for the kind comments, I hope you'll like what I've got planned for the SHADO Interceptor.
Amazing achievement Bill. So many phases!
ReplyDeleteExcellent work, Bill.
ReplyDeleteLooks super slick Bill. Well done! Looks brill. All they need is a mission now!
ReplyDeletelooks amazing Bill, you can bust my thrush anytime!
ReplyDeleteI seem to recall a flicker ring coming with this fab car. Is that right?
ReplyDeleteYes I did also have the Waverly Ring as it was called: flipping between Napoleon Solo and Illya Kuryakin. I've got a childhood photo taken of me with the car and wearing the ring too.
DeleteI might even have it in a box somewhere!
We need to see that childhood photo, Bill!
DeleteOf course. The Waverley ring! Cheers Bill.
ReplyDeleteLovely work! Aren't laser printers good for making your own waterslide decals? I've never looked back after discovering this technique!
ReplyDelete