..... Part 2,
Well, here is the basic process of how to make Sofubi style soft vinyl toys in your own garage. Believe me, this was a "suck it and see" painful (and costly) learning process for me.
I spent just under $AU 1500 on setting up all the equipment needed, but a good investment, right?
THIS REALLY IS THE LONG STORY SHORT VERSION!
First you need the original piece. Here I'm making Besset's Junk Yard safety gear, a repurposed World War 1 German Helmet! It's sculpted in Polyclay, baked hard, sanded, details added and puttied smooth.
When you've got the piece as good as it can be, you make a silicone rubber mould and cast it in wax. Tedious Technical Note: Wax drastically shrinks while cooling from it's molten state, so you need to let it set inside a pressure pot at 125 PSI until it's absolutely cold. -just so you know...
The prepared wax pieces then have to be smoothed and coated with a very expensive Electroconductive paint. Once they've had this applied with an airbrush, they MUST NOT be touched -or the oils from your fingers will ruin the surface before you've even got it into the plating bath...
So here we are, immersed in our expensive Copper Sulphate plating solution. Wax has a tendency to float, so I had to develop a system to lock it to the floor of the tank. Plates of raw copper are then hung from the aluminium support rails using stainless steel hooks. The solution needs to be warmed to operate properly and power must flow for at least 24 hours (more likely 48 or even more) to build up an unbroken film of pure copper of usable thickness. Hmmm, warm acid + wax = what could possibly go wrong?
Oh well done! You've got a mould of sufficient thickness and you've welded a thick wire support cage and high temperature soldered it in place. Interesting fact, the hot oil bath you will need to bake your PVC liquid will be only 20 degrees Celsius below the solder melting point!
Anyway, put your mould in a dedicated oven and melt out that nasty wax so you can reuse it!
Hey, that's a nice mould there, Son! You gonna stick it in the oil now?
Hmmmm, see my pot of boiling oil on the left? See that weird whitish bloom in it? That's leaked liquid PVC that has formed a big slimy jellyfish in my now ruined oil. Seems there was a pin hole in my copper mould and it leaked. Go directly back to the Start, do not collect $200. (in fact, pay $200 or whatever it costs to repeat the process!)
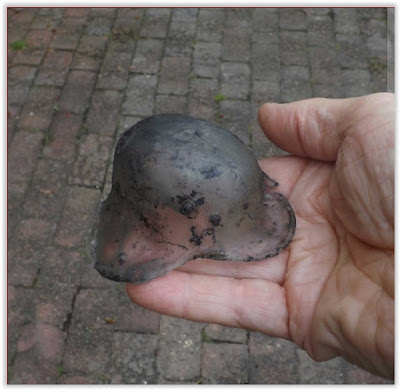
Hey Look! My first soft vinyl moulding! Sadly I was using Hard Grade Fishing Lure PVC and the end result is still too wobbly for toy use!
Oh well, start again...


Ah, this is the difference between making props and making products Lewis.
ReplyDeleteOur film and TV work only has to 'look' as if it was made properly, it doesn't actually have to be.
It's way beyond my mould making spectrum (plaster, vynamold, latex, silicon, fibreglass etc). Good luck with the rest of the process(es).
Good lord! What a tricky and complex process! I salute your dedication to the hobby, but this is way, way, way out of my league! More power to you! SFZ
ReplyDeleteIncredible skills Looey! What an amazing process. Did your next helmet turn out stronger?
ReplyDeleteRead on, dear Woodsy!
DeleteSee the triumph of a perfect Akubra Hat ( and although I don't mention it in these articles, a perfect Artist's Beret, complete with little tag on top!) Then read about making a Gal to wear all these hats!
Is there a Part 3 Looey?
DeleteWow. Amazing, and totally beyond anything I would even attempt. You are a brave man.
ReplyDeleteIt's a a brave new mould.
ReplyDelete