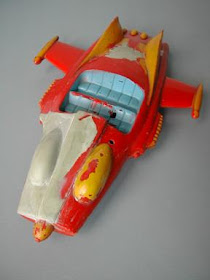
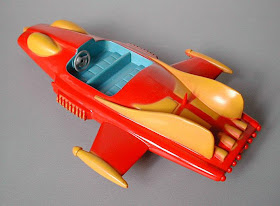
When I was approached 18 months ago to restore this 1962 Fairylite Supercar I thought it was beyond my modeling skills. But when a friend very kindly offered to lend me a more complete toy as reference, I decided to take on the challenge.
[Complete Fairylite Supercar picture supplied by reader Paul M for comparison, Woodsy]
The damaged Supercar was missing nearly two thirds of the nose area on the top part of the bodywork along with a front wheel. There was also a large jagged hole in the rear deck. The canopy was missing along with the steering wheel and Mike Mercury. I decided I could take on the wheel and bodywork but not the canopy. With agreement from the owner I embarked on the project which eventually took six months to complete.
Step one was to build a new wheel. I did this from red plastic card that was a close match to the original toy colour. I cut two discs with a circle cutter, stuck them together and filed a rounded grove into the edge to hold the tyre. I mage the tyre from a length of rubber pipe that was super glued to the rim. The finished result was very close to the original wheel but not identical. I used the new wheel on the rear axel because it was less visible.
The next task was to repair the front end. I did this with the aid of some Fimo style modeling putty which I used to take a push mould from the front of my friend's Supercar. Once I had baked the push mould in the oven it was ready for use. I moulded the front end section in Milliput epoxy modeling clay. The moulded section was fairly crude but the shape was essentially correct although a little shrunken in size. The difficult part was fixing the replacement bodywork in the correct place on the broken plastic. Once this was in visually aligned I tacked it in place with some superglue. I then packed a lot more Milliput into the body to fill in all the gaps. Once this hardened I was able to put a fair bit of pressure onto new bodywork graft without it breaking free from the plastic of the toy. The replacement Milliput section was solid at this point, and had to be hollowed out so that the wheel could fit into the nose bulge. The hollowing out process was quite tricky because the Milliput needed to be cut away until it was only about 1 mm thick. The front end had to go through several stages of filling and sanding before it was ready for painting.
Whilst the front end was underway I also started filling in the hole in the rear deck. I started by covering the hole with plastic card inside the body shell and then filling the recess with Miliput. Once this was hardened and sanded smooth, I built up the panels another layer of Milliput.
All of the Milliput work was filed, sanded and primed repeatedly until the surface was totally smooth and blended in with the original plastic. Once the surface was free of imperfections the top half of the body shell was sprayed in white primer. The finished top half of the body shell was then cemented to the base and the whole thing primed in white primer. I made a photographic record of the vintage paintwork before I primed any of the plastic so that I could replicate the original finish at painting stage.
I had to repaint the entire body to ensure an even colour. This was done using a Halfords red car paint that matched closely to the original red plastic. Once the red paintwork was applied, I masked out the cockpit and sprayed it pale blue using enamel paint matched to flakes taken from original interior finish. The next challenge was to spray all of the yellow details onto the body using specially cut loose masks designed to replicate the original finish. I took a rubbing of the Supercar lettering on the baseplate, scanned it in and drew it up on my computer. The finished type was then laser cut into vinyl and used as a stencil mask to spray the yellow lettering onto the base.The finishing touch I added was the steering wheel. I managed to find an exact match to the original in the remains of a Telsalda Thames camping van! See what you think!
Pictures and text courtesy of Ferryman.
Complete Supercar picture courtesy of Paul M.


What a -superb- piece of work that turned out to be! Excellent!
ReplyDeleteI'm just wondering, since I don't know the size of this thing, but that canopy looks rather similar in shape to a transparent Apple Mac mouse?
Best
--
Paul
An amazing job! I have seen one of these toys up close at a mates and your work matches the original very closely. Superb!
ReplyDeleteJim Lewis
A superb piece of work, the colour matching is extraordinary, and the slight over-spray of yellow just 'makes' the whole.
ReplyDeleteCanopy can be made the same way you did the bonnet, but smooth the clay former until is 'as good as' and then push it through a sheet of warmed clear styrene. I did this to make an 8-sided turret once and it works. I pined the sheet to a car-boot picture frame with a staple gun and held it over the cooker ring until the plastic went floppy, then shoved my balsa 'mold' through it on a stick.
But wonderful...
I dunno Ferryman....after that you should be renamed the Michaelangelo of plastic! A truly beautiful piece of art.
ReplyDeleteI so wish I had skills like that! I can only sit back and admire ^_^
ReplyDeleteI totally agree with Philosophic Toad, what skills... Extremely jealous over here! Amazing piece of art... Thanks for sharing and keep up the good work!
ReplyDeleteI am truely amazed by your outstanding and rare modelling skills and talent. What a pleasure it was to see how you brought back to life the old fairylite Supercar restoring it to it's bygone glory and originality.
ReplyDeleteDoc Ray Pierce
This comment has been removed by the author.
ReplyDeleteThis comment has been removed by the author.
ReplyDeleteThis comment has been removed by the author.
ReplyDeleteVery impressive indeed. All you need now is a canopy and it will be perfect.
ReplyDeleteI'm SO impressed! The soft edged stencil work on the nose blisters is especially nice. Methinks you missed your calling as a props maker!
ReplyDeleteCheers Looey. If I hear from Ferryman I shall pass on your commendation.
Delete